|
|
|
Aperture Priority
( How to blur your background of your picture )
Printer Friendly Version
In this tutorial I will teach you the basics to learn how to create that blurred look in the background of your photos with using only your camera.
Now you may ask, why would you want to blur your background? Good question.
A lot of times it depends on what your trying to achieve in your photo.
Lets say your up close on your subject and you want your subject to be the
main focus point of your picture. The background is not a priority in your
photo, so you would want to adjust your aperture to create more of a blur.
Although sometimes its nice to see your background, because maybe it creates
the perfect picture, which in this case you will want to adjust your aperture
accordingly.
There are many factors that play a roll in creating the perfect picture. We are just going to cover one part of that right now.
I have found the easiest subjects to take pictures of are ones that are not going to be moving. Now you may ask why non-moving subjects, why not
an animal or a person. People and animals can move and if you don't have enough light or your shutter speed is set really slow, it will create
a blur on your subject and they will look out of focus. I've even found wind on subjects such as flowers or trees can also create a factor in
the picture not turning out like you would like it to. Now as for me, you can see most of my subjects are outside and could bolt at any second.
This can create a challenge, because I may only have a few seconds to adjust my camera settings accordingly. It takes time and practice to create
the look you want people to see when they see your photos. I have found by practicing on objects that are not going to move will help you become
a better photographer for in the moments when all you have are a few seconds you will know what you want to do with that picture, and how you want the
world to see it.
A tripod is a must when taking most of your pictures. It keeps your camera steady and will help you get the best picture possible. When you
are doing enlargements of a picture if you didn't use a tripod you might have moved a little bit and it will show in larger photos. Shutter speed
can also play a larger factor in this. Now one of the big reasons why I say a tripod is a must cause I find when I want my aperture to be number one
priority, sometimes I cannot get a fast enough shutter speed. Light plays a big roll in how fast you can adjust your shutter speed. So does different
size lenses.
Ok, now to the main part of this tutorial. Everything I talked about above will all be factors that could effect your picture when your aperture is
priority.
The smaller the aperture the wider the depth of field is. What does this
mean? This means when you look into your view finder in your camera you
will notice at the bottom some numbers. The first number is your shutter
speed and the second number is your aperture value. You may ask, So does
that mean the smaller the number in there the smaller the aperture? The
answerer is no. Why? I know it seems confusing, but the larger the number,
the smaller the aperture.
Again, The larger the number, the smaller the aperture. This will make your background look more focused. If you want a larger aperture, the
smaller you number will have to be. This will create more of a blurred look in your background.
Again, The smaller the number, the larger the aperture. So with a larger aperture this creates a narrower field of depth.
Here some examples below.
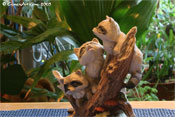
To give you an idea of a smaller aperture view the example below. This was taken with a 15 second shutter speed and the aperture was set to 22.
Example:
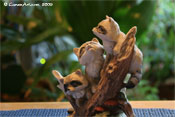
Here is the same picture but with a larger aperture. This was taken with a 1.3 second shutter speed and the aperture was set to 5.6.
Example:
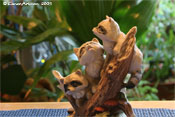
Now here is the same picture with the aperture set to 10 and the shutter speed set at 4 seconds.
Example:
Now remember the smaller the aperture the larger the number you will see inside your camera. I really hope this tutorial helps everyone understand how to blur the
background in your pictures. You can see all 3 of these photos side by side in the example below.
Example:
|
^ Return to Top ^
|
|


