|
|
|
Color Filters
( How to dramatically add life to your photos )
Printer Friendly Version
In this tutorial I will teach you about using colored filters on your camera and how they can dramatically add life to your photos.
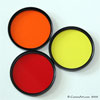
There are a few different styles of filters you can buy for cameras.
There are some that have an adapter that attaches to the end of your lenses.
These filters are square shaped. They slide into the slots in
front of your lens. These are nice to use if you have different lens sizes.
Then you only have to buy the different adapters for the lenses and you
can use all your filters with any lens. I personally use the type that screw
into the end of your lenses. I like them because I don't have to worry about
them falling out of the slots. Here are a few different colors you can purchase
at most any local camera shop. If they don't have them in stock they can
order them for you.
Example:
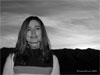
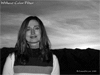
Color filters are great to use in many different applications. They are even great to use with black and white photos. Black and white photos you may ask? Yes,
black and white photos. They don't show any colors if that's what your thinking. What color filters do with a black and white photo is they soften the different
shades and add a subtle glow to your photos. Different color filters can also enhance skin tons along with make your whites have a cleaner, more crisp look to them. Here is what the outcome looks like when using color filters with black and white photos.
Example:
| Without Color Filter |
With Color Filter |
 |
 |
Over lapped for better comparison. |
 |
Now you may be wondering about the shutter speeds with these type of photos.
It depends on the light you have. Lets say in great light conditions you
might shoot photos at 1/250 of a second without any filters. As you add
filters to your lenses, the amount of light that will come into your camera
can increase or decrease. Therefore you might have to make some adjustments on your camera.
What I like to do is set my camera up on my tripod and get everything set
the way I want to shoot the picture. Then I add my color filter after I
have the camera settings the way I want them. It depends on what color I
add. If I use a darker color such as red or even orange. The amount of light
coming into my camera decreases a bit. If I adjust my aperture
to allow more light into the camera I will not get the same effect as I
wanted in the beginning. So I will shoot the photo at a lower shutter
speed to get the effect I want.
If I use an orange filter when taking a picture my shutter speed will drop
down from 1/250 of a second to 1/180 of a second. This will still allow
you to take a pretty good photo of people even if they move a little bit.
If your to use a yellow filter when taking photos like this your shutter
speed will increase some. Yellow is a brighter color filter which tends
to bring more light into your camera. Therefore you will want a faster shutter
speed so you don't over-expose the photo. A yellow filter can increase your
shutter speed from 1/250 of a second to 1/350 of a second.
Now remember your shutter speeds may vary depending on your light conditions. These are some example conditions I have come across.
When you start shooting scenic type photos with color filters you can end up with some really dramatic looking photos. You will get some
people say why use color filters when I can add the same effect in Photoshop®.
There are those photos that adding the color effect in photoshop will not bring out certain effects that normally won't show up in a standard photo.
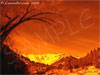
Let me give you an example. Here is a photo I took without a color filter.
Example:
Here is the same shot, but with a red color filter. You will notice the clouds show up and it adds such life to the photo.
Example:
So as you can see something like this would not be very easy to add in Photoshop. I'm sure it can be done, but the out come won't be exactly the same.
For me it is easier to add awesome looking effects with my camera rather than using photoshop. It only takes a minute with your camera verses hours of
work in photoshop.
It's amazing how much life and color is added to a photo just by using different color filters. You can use color filters all year long. I have also
found that using them in the winter months when there is not much for natural color, really brings a photo to life.
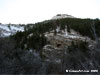
Here are a few more neat examples of using a few different color filters while taking pictures.
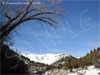
In this photo I did not use any color filters. I used a shutter speed of 1/250 of a second.
Example:
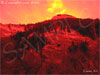
This is the same shot, but with a red color filter. The red color filter is a darker color therefore the shutter speed will decrease to
1/125 of a second. I have found certain kinds of scenic photos look better with a red color filter. This is not one of them.
Example:
I have found taking scenic photos such as sunsets and sunrises really look neat with the red color filter.
Here is the same shot with a yellow color filter. On this photo I used a shutter speed of 1/400 of a second.
Example:
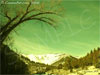
Now you are probably wondering why does it look all green. Now it's time to reflect back to your primary colors. Yellow and blue make green.
The one thing I really love about the yellow color filter is when taking scenic photos it tends to bring your greens out. It gives greater detail
to plant life.
This was the final shot of this same spot. I used the orange color filter. The shutter speed was set for 1/200 of a second.
Example:
Out of all my different color filters I have, orange is one of my most favorite filters to shoot in. Orange creates such a neat look to almost any photo.
I also like to use my orange filter when shooting in black and white. If I could recommend any color filter to get first, it would have to be an orange color filter.
I really hope this tutorial helps you in adding beautiful colored life to your photos.
|
^ Return to Top ^
|
|


