|
|
|
Shrink Photos
Well here is a few steps to help you shrink a photo in paint quick without any fancy programs.
1. First
off, incase you don't know where to find the Paint program
that comes with Windows® here's how to find it. Click
on your  button at the bottom of your screen. Your start button will
expand up and then click on "All Programs" or it might say
"Programs" depends on your OS (Operating System). Then All
Programs will expand out and then click on
button at the bottom of your screen. Your start button will
expand up and then click on "All Programs" or it might say
"Programs" depends on your OS (Operating System). Then All
Programs will expand out and then click on  and Accessories tab will expand out. Then go down to
  and click on it. Now with the Paint Program open you can open
a photo into it and start to edit it.
and click on it. Now with the Paint Program open you can open
a photo into it and start to edit it.
2. Now to load a photo in paint. Click on the tab called "File" at the top. File
tab will expand out and then click on "Open". Now you will have a window box in the middle of your screen.
Now all you have to do is find where you have the photo saved at. Then click on it and its name will be in
the box below and then click the tab  . Now your photo will be in the screen. . Now your photo will be in the screen.
3. Now we can shrink the photo down
so that the file size of it is smaller. To shrink the photo
click on tab that says "Image" and a menu will drop down.
Then click on "Stretch/Skew..." tab. Here's what it will look
like. Click on the below thumbnail to view full screen.

4. Now you have clicked on the "Stretch/Skew..."
tab and a window will open up. Now click in the first box
that says: Horizontal 100 % and put a smaller number in it
such as: 50. This will resize it down to 50% of the original
photo size. Before you hit the "Ok" button, You need to click
in the box that says: Vertical 100 % and put the same number
as what you put above. So if you put 50 in the box for Horizontal,
you need to put 50 in the Vertical box also. This way your
picture will resize down in proportion to the original photo.
Just to give you an idea of how much you need to shrink a
photo, if your photo is 300 Kb but you can only upload 150
Kb then resizing your photo down 50% would be great, and that
would put your photo at 150 Kb roughly. But if your photo
is 500 Kb, then you need to shrink your photo down to 30%
to make the photo 150 Kb. Just so you understand what this
means; You are not going to shrink it down 30% of 100% to
make it 70% in each box. It will not shrink your photo down
enough. What this means is you need to put 30 in the Horizontal
box and put 30 in the Vertical box to shrink the photo down
enough to make the size smaller. Now hit the "Ok" button and
your photo will shrink down to the size you said. If this
is not enough, shrink it down in smaller increments such as:
putting 95 in the horizontal box and 95 in the vertical box.
Remember this is for the Paint program in Windows®. Click
on the below thumbnail to view full screen.

5. Once you have your photo sized down
to were you want it. You will need to save it. Now when you
save it; if you decide to use the original photo name, such
as your original photo was named: johndoe, you might want
to change it somehow. (EXAMPLE: johndoe2 or johndoemini) Before
you finish saving photo make sure your saving it as a jpeg
so that it doesn't take up so much space. Yes a JPEG is a
lower quality picture than a bitmap photo, but it will save
a lot of room on your computer and will make it small enough
that you could load it on to the net faster. Now to save the
photo as a JPEG in Paint. When you click "File" above, it
will drop down a menu and then click the "Save As..." in the
"File" tab. Now your Save As box will open in the middle of
the screen and you can save your photo now. Before you save
your photo make sure to select JPEG format. Here's a Thumbnail
below so you can see were JPEG format is.
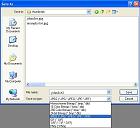
Now you can hit the save button.
6. Now if you have more than one photo to shrink, Repeat steps 2 threw 5. Enjoy and
I hope this helps you out.
^ Return to Top ^
|
|
|
|
|


